This post is an addition to something I posted recently: https://www.ustoopia.nl/games/build-a-private-wow-wotlk-server-with-npc-bots-on-ubuntu-22-04/
So, you have your own private WoW server running now, and you would like to invite some friends to come and play with you on your realm. That is exactly when this tutorial comes in handy! To streamline the process of creating a user account for your realm, we’ll be setting up a simple web page where people can register themselves.
In order to follow this guide, an important requirement is that you have a domain name pointing to the IP address of the server that you’ll be using to host the pages. In this example, I’m using the domain wotlk.servegame.com, which is pointing to the same server where I’m running a private World of Warcraft realm. This is the easiest way to do this, but it is entirely possible to host the pages on a different server if you would prefer.
Please note that I did all this on a server running Ubuntu 24.04. The website that we’ll be setting up can run on any web server that supports PHP. This can be, for example, Apache or Nginx, or Lighthttpd, or really any other web server hosting software that works with PHP. The web package does however depend on a couple of modules for PHP that are not installed by default when you install PHP. So, manually installing these modules is very important. If you don’t, it simply isn’t gonna work. I like Nginx, so I decided to use it in this tutorial since it’s arguably the easiest one to set it all up
For the sake of this tutorial and the YouTube video, I used the temporary, dynamic DNS name: wotlk.servegame.com. I want the web files to be in a sub folder op /var/www, so I choose: /var/www/wotlk.servegame.com/web. I’m setting it up on the same server as where my WoW server is running on. This is not required, but it does require you to use different settings as what I’ll be showing here. Just use your brains, and all is goin’ to be fine.
1. Installing some requirements
The registration pages require a web server, obviously, like Apache or Nginx with PHP in order to run. I choose to use Nginx because I simply prefer using it. The website we’re going to run requires a couple very specific PHP packages, so let’s start with installing these. But first we’ll add the very popular Ondrej repository, and after we proceed with installing all the required packages.
sudo add-apt-repository -y ppa:ondrej/php
sudo apt update
sudo apt install git nginx php php-fpm php-cli php-json php-mysql php-zip php-gd php-mbstring php-curl php-xml php-pear php-soap php8.3-fpm php8.3-soap php8.3-gd php8.3-mbstring php8.3-gmp php8.3-curl php8.3-zip php8.3-mysql
We’re going to host the web files in a folder under /var/www. So let’create this folder and some subfolders first.
sudo mkdir -p /var/www/wotlk.servegame.com/{web,logs}The next line will create an index.html page as a temporary placeholder for your website.
echo "Test HTML Page" | sudo tee /var/www/wotlk.servegame.com/web/index.html
I want to see if PHP is working once we’re done configuring everything. The easiest way to achieve this is to place a phpinfo.php file in the web root folder that contains PHP code that will show us info on PHP.
sudo nano /var/www/wotlk.servegame.com/web/phpinfo.php
Copy the following bit of code in the phpinfo.php page and save the file:
<?php
phpinfo();
?>
2. Setting the hostname
I always prefer to set the host-name of a server to the domain name I’m using for the server. Skip this step if you want to keep your current hostname.
sudo hostnamectl set-hostname wotlk.servegame.com
Or add an entry in the /etc/hosts file.
sudo nano /etc/hosts
Here’s a screenshot of what my hosts file looks like as an example:
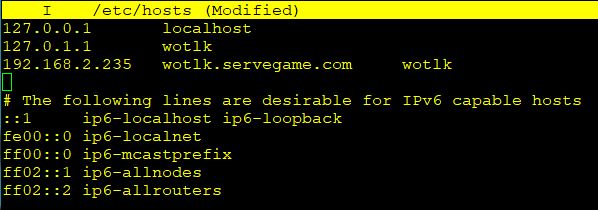
Save the file and let’s continue setting up Nginx.
3. Preparing our Nginx web server
The web server Nginx uses the group and user www-data, so we should change the ownership of the hosted files to this.
sudo chown -R www-data:www-data /var/www/wotlk.servegame.com
Now we’re going to create a virtual host config file in Nginx for the domain that is pointing to your server. In my case: wotlk.servegame.com
sudo nano /etc/nginx/sites-available/wotlk.servegame.com.vhost
Paste what you see below, but make sure you change the address so it will be your own domain.
server {
        listen 80;
#       listen [::]:80;

	server_name wotlk.servegame.com;

        root /var/www/wotlk.servegame.com/web;

        index index.php index.html index.htm index.nginx-debian.html;

	access_log /var/www/wotlk.servegame.com/logs/access.log combined;
	error_log /var/www/wotlk.servegame.com/logs/error.log warn;

        location / {
                try_files $uri $uri/ /index.php?$args;
        }

	location ~ .php$ {
		include fastcgi_params;
		fastcgi_index index.php;
		fastcgi_intercept_errors on;
		fastcgi_split_path_info ^(.+.php)(/.+)$;
		fastcgi_pass unix:/var/run/php/php8.3-fpm.sock;
		fastcgi_param SCRIPT_FILENAME $document_root$fastcgi_script_name;
	}
}
Perhaps you noticed that line 3 is commented out? Why is that? Well, I’m not using IPv6 on my server, so I had to disable this line to prevent an error in Nginx when reloading it. In case you are using IPv6, go ahead and uncomment this, so your webserver will also listen for requests over IPv6 and not just IPv4. In case you don’t know, just try if it works when uncommenting line 3. If it doesn’t, then simply restore the comment.
To activate our new configuration, we’ll need to create a virtual link from our sites-enabled to our sites-available.
sudo ln -s /etc/nginx/sites-available/wotlk.servegame.com.vhost /etc/nginx/sites-enabled/
Let’s do a test first to see if Nginx finds any errors in our config file.
sudo nginx -t
If there are no errors found, we can restart Nginx so it will load the new config.
sudo systemctl restart nginx
4. Allow traffic for Nginx through the firewall
Ubuntu comes default with UFW firewall. We need to let UFW firewall know that traffic to Nginx should be allowed. First, let’s see if Nginx is mentioned in the UFW app list.
sudo ufw app list
The following command will instruct your firewall to allow all traffic for Nginx.
sudo ufw allow 'Nginx Full'
5. Enable PHP modules
The next couple of lines will enable a bunch of modules for PHP in our php.ini config file. Once the changes are made, don’t forget to restart the php-fpm service. I’m showing this with version 8.3 for PHP, since this is the default version for Ubuntu 24.04 server.
sudo sed -i 's/;extension=gd/extension=gd/g' /etc/php/8.3/fpm/php.ini
sudo sed -i 's/;extension=gmp/extension=gmp/g' /etc/php/8.3/fpm/php.ini
sudo sed -i 's/;extension=curl/extension=curl/g' /etc/php/8.3/fpm/php.ini
sudo sed -i 's/;extension=soap/extension=soap/g' /etc/php/8.3/fpm/php.ini
sudo sed -i 's/;extension=mysqli/extension=mysqli/g' /etc/php/8.3/fpm/php.ini
sudo sed -i 's/;extension=mbstring/extension=mbstring/g' /etc/php/8.3/fpm/php.ini
sudo sed -i 's/;extension=pdo_mysql/extension=pdo_mysql/g' /etc/php/8.3/fpm/php.ini
sudo sed -i 's/;cgi.fix_pathinfo=1/cgi.fix_pathinfo=0/g' /etc/php/8.3/fpm/php.ini
sudo systemctl restart php8.3-fpm
6. Certificates
We’re going to need a certificate so we can ensure a safe website. Luckily, Letsencrypt allows us to request a free, valid certificate. There are many ways to achieve this. I’m going to install Certbot through Snap, a method that Letsencrypt advises everybody to use.
sudo apt install snapd -y
This will update Snap to its latest release.
sudo snap install core; sudo snap refresh core
Now install Certbot:
sudo snap install --classic certbot
I prefer to use this little trick, but it is completely optional for you. If you don’t know what it does or means, simply skip it then.
sudo ln -s /snap/bin/certbot /usr/bin/certbot
With Certbot installed, we can finally request our free certificate.
sudo certbot --nginx -d wotlk.servegame.com
I always prefer to take a peak after the Nginx configuration was edited by certbot, to make sure all went well.
sudo nano /etc/nginx/sites-available/wotlk.servegame.com.vhost
Do another quick test to see if there are no errors:
sudo nginx -t
And restart Nginx once more:
sudo systemctl reload nginx
For those who are following this guide: You’re doing great! We’re at least halfway done with the tutorial right now.
At this point you could do a quick check to see if your server is properly configured or not. Simply visit your website in a webbrowser. We created a file that tells us if PHP is enabled, so you might as well view this file at this moment. https://wotlk.servegame.com/phpinfo.php
7. Enable SOAP in worldserver.conf
In case your WoW server is currently online, please make sure that you stop the server before continuing, because we’ll need to change a setting in the worldserver.conf
sudo nano /games/wow/wotlk-bots/etc/worldserver.conf

We need to enable the SOAP functionality, so scroll all the way down, or simply search for “soap”. Make sure that you set SOAP.Enabled = 1 here. The other two options for SOAP can be left how they are.
Save the worldserver.conf and then you can restart the WoW server again. At this point, it might be a good idea to start the realm manually from the command line, because that allows us to create a new user account for the SOAP protocol on your server. So, once your realm is up and running, use the example below to create a user. This creates an account named SOAP with ‘trinity’ as the password.
account create SOAP trinity
Feel free to choose any other username, and be sure to replace ‘trinity’ with your own password. Now set the gmlevel for this new acount to 3.
account set gmlevel SOAP 3
8. Create a free hCaptcha or ReCaptcha account
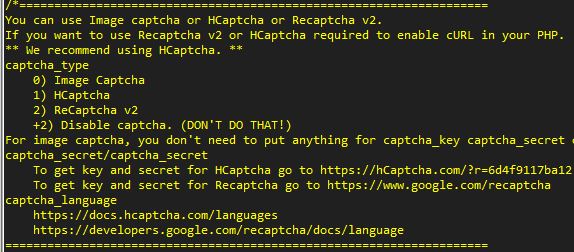
Our website will need a form of Captcha. So, the config.php file allows you to choose between three options. Either a simple built-in image captcha, or Google’s reCaptcha, and also hCaptcha. I have noticed while putting this tutorial together, that the image captcha didn’t function at all, making it impossible to complete the registration process. I went on to try Google reCaptcha, but for some reason, this wasn’t working for me either! Leaving me with the last option of hCaptcha, and luckily this one did work. So if you run into the same issues as me, hCaptcha will be right for you. EDIT: Google’s ReCaptcha also seems to work fine now. By the way, this is all free of charge. You’ll need to register first, and then setup your website at https://www.hcaptcha.com, so you’ll receive an access key plus secret. Save these somewhere safe, or note them down, since we’ll be needing these later on.
9. Setting up the website
Download the files that will make up the website directly from the official repository to any location:
git clone https://github.com/masterking32/WoWSimpleRegistration
Copy all the files to the folder that you are using to host the website.
sudo cp -r WoWSimpleRegistration/* /var/www/wotlk.servegame.com/web/
Head in to the application/config folder, and you should find a “config.php.sample” file there. Copy this file to a new file named “config.php” in the same folder.
cd /var/www/wotlk.servegame.com/web/application/config
cp config.php.sample config.php
Now let’s open the new config file in a text editor so we can set some important, required, parameters so the website will start to funtion properly for you.
nano config.php
Take your time to go through all the options in the config file. Make sure to edit the address to your site, and of course the database login details, and hCaptcha. Once you’re done editing config files, it would be a good idea to ensure that ownership of the web files belongs to www-data.
sudo chown -R www-data:www-data /var/www/wotlk.servegame.com
I strongly advise to pay attention on how you’re going to use the SMTP funtionality. There are benefits if you configure a proper, working SMTP server, ensuring that you can trust that all e-mails are sent. I use the SMTP server from my internet provider, and that works perfect. When you are confident that mails are handled be the SMTP server, you can then enable the option of sending a confirmation email whenever a new user has registered for you WoW server. Save the config file when you’re done, and well. you are now done! It’s time to visit your new website in a webbrowser, do a test by creating a dummy account, and the last step is to inform your friends where they can find your website.
Good luck! And have fun!
Gr,
Andre